Please pardon the cross post....
I received this event poster in my email the other day. All the info about the Seedy Saturday event in Creston for 2012. As usual it is at the New Life Christian Church just east of the high school on Elm in their basement. There will be seeds to trade, pick up and to purchase. Local farmers are encouraged to bring in their products as well.
There is no charge to get in as there is no presentation this year. The college is instead offering 2 classes in seed saving one in May and the other in the fall at the college itself.
If there is any specific questions or information you want covered at the classes please send me an email. It seems it is my turn to lead this class. Brenda, Karen, Dan, Holly and others have all had a turn and with Holly moving.... Oh boy.
I've been busy laying out an outline and thinking of ways to present the materials with photos and hands on activities. Any ideas are appreciated!
Any favourite seed saving resources? I am trying to put together a good collection of handouts for participants and am going to bring all the seed saving books that I refer to. It is nice to see what is out there before purchasing anything.
Anyways ... Seedy Saturday, Creston, 2012, March 10, 1-4, New Life Christian Church, 1821 Elm Street.
See you there!
Saturday, February 11, 2012

Saturday, January 21, 2012
Ever had one of those years....
It was busy, it was crazy, it was life.
I did post over at the seed blog today, check it out.
I have plans, seed catalogues, and gardening books, I am a dangerous woman.
Now that we know for sure that we won't be moving this spring out to a farm I can focus on the improvements we'd like to see here in town. Asparagus, for instance. Dh put in new counter tops in the kitchen, he's working on the half-bath. Our sewing room which never saw any sewing in has become our seed room. I can actually find what I am looking for!!! (Um, yes, I do have that much seed. It's embarrassing.) I have plans for a cold room as we just discovered EVERYTHING we put in the old make-shift one has spoiled, not cold enough this mild winter. The canning needs to go somewhere cooler too. Big plans, poor dh.
And I am going to shop, which I rarely do outside of garage sales and second hand shops. I need a new bike able to haul gardening tools 3km up a mountain-side with tubby old me at the pedals. This might take a while for me to convince myself to do. Years maybe.
I'd also like to point out that my life isn't complete without chickens. I was hoping to remedy that by moving. Now that is no longer an option. Chickens are still mainly illegal here-abouts. Maybe this can be changed??? Challenged??? Gotten over???
I have been trying to convince one of the children to go out with me to measure the garden so I can start planning the garden with the addition of the asparagus bed. For some reason none of them want to go out on the busy road side of the house and march about with mommy and a measuring tape in the snow. Weird.
Till spring I'm just going to keep reading seed catalogues, await Sharon Astyk's new book by reading all her old ones, and the really cool books my mom got me for Christmas. Vandana Shiva's 'Stolen Harvest' and Masanobu Fukuoka’s 'The One-Straw Revolution'. And knit socks ... lots of me socks.
Thursday, June 16, 2011
Updating the Stop Sign
I hate mowing around our stop sign, it is always a messy tuft of long grass. Youngest ds took care of it for me, both beautifying it and making it easy to mow around.
First he cut out the sod around the sign in a circle and mixed in some potting soil and compost.

Then we walked to the greenhouse and picked up some full sun flowers that he proceeded to plant. Well done son! We'll have to check back and see what it looks like later in the season when all of the flowers are blooming.

Now if I could convince dd to yarn bomb that rusty old post....
Sunday, June 12, 2011
More Mushrooms!

Once in a while, maybe once a year, I find mushrooms in the discount bin at the grocery store. LOVE.
This year's haul:

Firstly ds and I filled the dehydrator with them, all six large trays of our Berron's.

Then all of the rest were pickled as per this recipe. Delicious, I could live on these!
This was the final result; nearly 2 full 2 quart jars of dried mushrooms and 11 one quart jars of pickled mushrooms. [of course this jar is already opened and sampled from]

I've already used the dried mushrooms in a recipe, minute steaks in an onion mushroom gravy. Quite yummy. I think in any recipe that calls for mushrooms that are going to be simmered in a liquid I can substitute these. Soups, chili, stews, this gravy....
Wednesday, June 8, 2011
The 2011 Season Starts - Garden
The biggest change around here has been in the garden. Once upon a time we had a tiny front garden and planted a row of raspberry canes on the west side. Then they expanded down the north side some. And we expanded the garden itself to the north, and then to the west. Which left us with, basically, raspberries in the middle of the garden shading way too much and interfering with other plantings, rototilling, etc. Then there were the original landscape ties encircling the garden which were also in the middle of things, being in the way.
In this picture you can see the problem. [strawberry bed to the left, garlic to the right, fall rye (green manure) in the foreground, undisciplined raspberries behind with more garden area behind them and to the right]

The in-laws came over for Easter and as usual we had to have a project, this year's was to move the raspberries to the far north edge of the garden. That didn't completely get done but my much desired fence posts to build a trellis to rein them with did get installed.

Much begging lead to the addition of a frame built around the raspberry area too. Then the daughter with the gardening gene and I moved those pesky raspberries north. Ya us!
Then dh was called in to rotovate with orders to remove the landscape ties along the west and north edges of the old garden while I headed off to work. He be not so good with orders :-) I came home to find the original garden un-rotovated as the ties were still in place. Luckily I had a biddable 16 yo son who was desirous of mom's good graces. He removed said ties and dh finished the job.
[What!?! Doesn't your dh have a tractor with offset rotovator??? I thought all urban dads had one. huh. Must just be the market garden on the side, farming addicted ones ;-)]

Then the planting got done, what a long job that is .... I should pop out and take some photos .... Out into the rain I go.... Returned a little damp with these photos:
This first garden photo is taken from the same position as the first one above showing the original problem, much better.:

Looking north, in the ditches are potatoes, the hills will be shoveled over the potatoes as they grow. The stacked up drawers are my sprinkler stand, though it's been too wet to bother with the sprinkler yet this year. You can also see some milk jugs covering some of the baby tomatoes and a couple of the cucumbers. There is also a large cloche covering 4 more cucumbers while 4 more are out in the rain for comparison of growth:

Third photo; baby lettuces, peas on trellises, and little tiny zucchini plants, the dirt rectangles are bush beans, as yet not up:

Fourth photo; the new raspberry patch with trellis built, and another type of pea trellis:

Looking south; the cabbage condos, more pea trellises, and a block of carrots:

Lastly, the dd's weedy sunflower patch, more pea trellising, the cabbage condos, and a great shot of the utility sink I'm currently using as a potting bench soon to be a veggie washing station:

Later on I'll explain the excess of peas and the nitty gritty of the cucumber cloche and the cabbage condos.
In this picture you can see the problem. [strawberry bed to the left, garlic to the right, fall rye (green manure) in the foreground, undisciplined raspberries behind with more garden area behind them and to the right]

The in-laws came over for Easter and as usual we had to have a project, this year's was to move the raspberries to the far north edge of the garden. That didn't completely get done but my much desired fence posts to build a trellis to rein them with did get installed.

Much begging lead to the addition of a frame built around the raspberry area too. Then the daughter with the gardening gene and I moved those pesky raspberries north. Ya us!
Then dh was called in to rotovate with orders to remove the landscape ties along the west and north edges of the old garden while I headed off to work. He be not so good with orders :-) I came home to find the original garden un-rotovated as the ties were still in place. Luckily I had a biddable 16 yo son who was desirous of mom's good graces. He removed said ties and dh finished the job.
[What!?! Doesn't your dh have a tractor with offset rotovator??? I thought all urban dads had one. huh. Must just be the market garden on the side, farming addicted ones ;-)]

Then the planting got done, what a long job that is .... I should pop out and take some photos .... Out into the rain I go.... Returned a little damp with these photos:
This first garden photo is taken from the same position as the first one above showing the original problem, much better.:

Looking north, in the ditches are potatoes, the hills will be shoveled over the potatoes as they grow. The stacked up drawers are my sprinkler stand, though it's been too wet to bother with the sprinkler yet this year. You can also see some milk jugs covering some of the baby tomatoes and a couple of the cucumbers. There is also a large cloche covering 4 more cucumbers while 4 more are out in the rain for comparison of growth:

Third photo; baby lettuces, peas on trellises, and little tiny zucchini plants, the dirt rectangles are bush beans, as yet not up:

Fourth photo; the new raspberry patch with trellis built, and another type of pea trellis:

Looking south; the cabbage condos, more pea trellises, and a block of carrots:
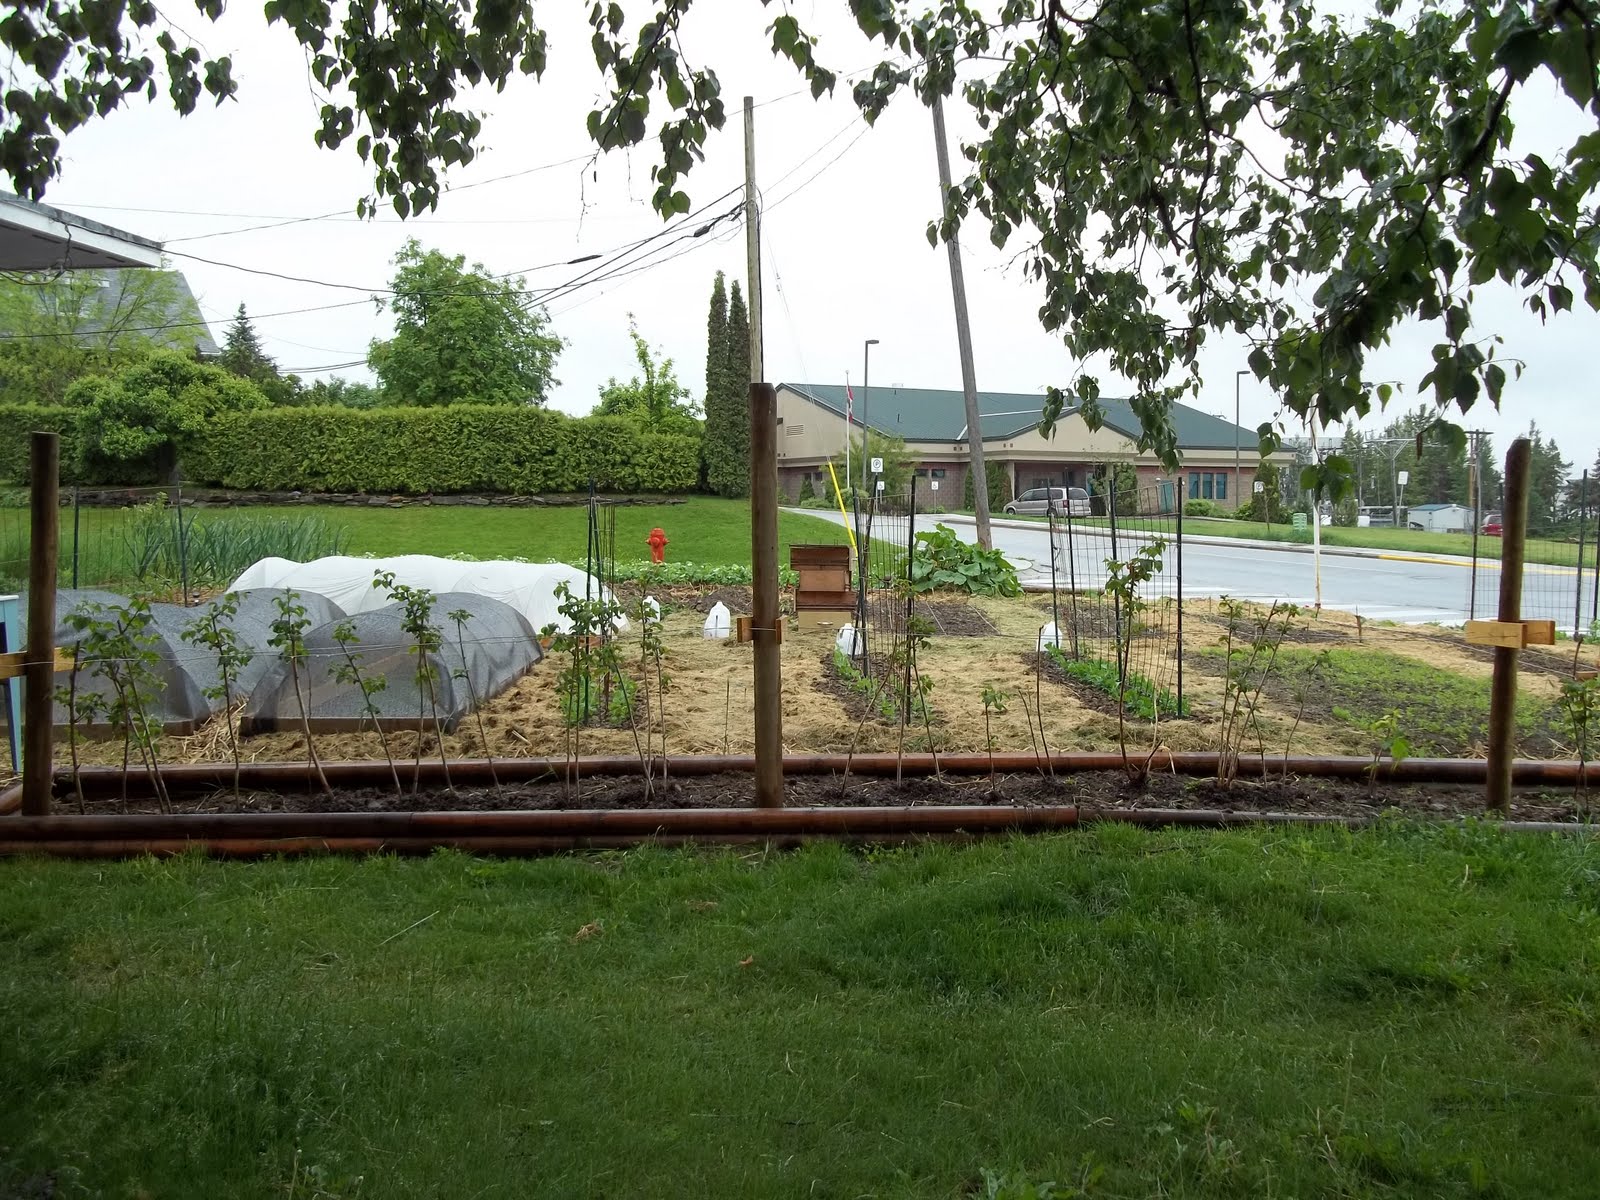
Lastly, the dd's weedy sunflower patch, more pea trellising, the cabbage condos, and a great shot of the utility sink I'm currently using as a potting bench soon to be a veggie washing station:

Later on I'll explain the excess of peas and the nitty gritty of the cucumber cloche and the cabbage condos.
Sunday, May 29, 2011
Spring Seeding for Transplants

As usual we ordered a tonne of seed, the above photo is only one of our seed orders. [This one from Heritage Harvest Seed in Manitoba] Many of these needed to be grown out for seedlings. With a last frost date of mid May we can get a jump on the season as well as getting long season plants such as tomatoes ready by planting them early. [You must be asking 'whattheheck??' Why would a seed grower need so much seed??? Dh grows items I don't yet save from and I am always on the lookout for more varieties worthy of saving. Thus buying more seed to trial. You can learn more about the seed saving at the Itty Bitty Seeds Blog.]
I learned last year that using our own compost for planting seedlings gives them a boost over anything I have found commercially. I learned this year that straight compost sieved fine sets up like concrete once it dries out. I'm thinking next year of planting out in compost mixed with a commercial planting mix we can use and still qualify to be certified under our local 'organic' label.
Our long term goal is to be certified Kootenay Mountain Grown. It will take time as there are many small details that have to be scrutinized and okayed or more likely changed to be in-line with the set standards. This isn't for our home garden, that would be nuts, but for dh's market garden and for my garden seeds that I 'sell'. Everything has to be reviewed, our potting soil, seeds, mulch, pest and disease management practices, overall farm practices as well as long term goals concerning improving the farm we lease. Big head ache, but well worth it to have his veg and my seeds able to have that reassurance for our customers that we are farming in a responsible organic manner.
This year's seedlings were planted mainly in well screened compost and grown out under lights in our 'dining room'. This wasn't ideal and I'm looking into alternatives for next year. They did okay, but weren't quite as nice as those grown in a heated greenhouse. We don't have the space for such as thing here at the house and couldn't do such on our leased farm so alternatives are being looked at. I may beg space from a friend if I don't get a space at the local community greehouse. [Which is a beyond cool programme BTW!]
And now ... just some plant love pictures...


Friday, April 15, 2011
Old Bathroom Drawer Lettuce Planter
When we renovated the bathroom we kept the drawers from the vanity, there had to be SOMETHING that they could be used for! Three of them are in our garden stacked up holding the sprinkler up high. Here is another use. Looking through the shed, basement and greenhouse for a planter for the lettuce seeds I started last month lead me to these. Hmmmmmm this could work. Take one old drawer, clean it out:  Line it with a plastic garbage bag, I had to split this one to make it large enough:

 Staple gun the edges all around:
 Trim the plastic and then staple again where it is gapping:
 I took the lettuce seedling I had planted out a month ago, some of dh's onions, and some leftover radish seeds:
 Separated out the lettuces and spaced them out in the drawer:
 Planted a row of the onion seedlings down the middle:
 And finally sprinkled some radish seeds all over, they can be thinned as needed:
 There it is all done:
 The radishes will be ready to eat in 3-4 weeks, more can be seeded as needed so there can be a steady supply. The onions can have their tops trimmed for green onions, they will continue to grow more and won't need reseeding. The lettuces can have the outer edge leaves snapped off for salads while the little inside leaves keep growing. All that is really needed is for a container sized tomato plant growing alongside.
I'll stick this where it will get enough sun yet not get overheated and where it will be protected from the frost. Handy this as our conditions in the yard vary as it heats up during the season. Where it will grow nicely now in the cool spring it would bake during the summer. When it does get hot I think the deck stairs on the north side of the house will be best. For right now, either on the south side of the house or even in the greenhouse will work. It is still mighty chilly overnight!
~ ~ ~ ~ ~ ~ ~ ~ ~ ~ ~ ~ ~ ~ ~ ~ ~ ~ ~ ~ ~ ~ ~ ~ ~ ~ ~ ~ ~
Edited to add that the lettuce drawer could use more drainage, or a big sign that says, "Don't water me so much kids!" It doesn't look as healthy as it could.
 Line it with a plastic garbage bag, I had to split this one to make it large enough:

Get some gravel from somewhere for a drainage layer, I found these on the lawn:  Then add your soil, this is (gasp)from a bag. Planter soil with some compost added. Spread it out...
 Then add your soil, this is (gasp)from a bag. Planter soil with some compost added. Spread it out...
 Staple gun the edges all around:
 Trim the plastic and then staple again where it is gapping:
 I took the lettuce seedling I had planted out a month ago, some of dh's onions, and some leftover radish seeds:
 Separated out the lettuces and spaced them out in the drawer:
 Planted a row of the onion seedlings down the middle:
 And finally sprinkled some radish seeds all over, they can be thinned as needed: There it is all done:
 The radishes will be ready to eat in 3-4 weeks, more can be seeded as needed so there can be a steady supply. The onions can have their tops trimmed for green onions, they will continue to grow more and won't need reseeding. The lettuces can have the outer edge leaves snapped off for salads while the little inside leaves keep growing. All that is really needed is for a container sized tomato plant growing alongside.
I'll stick this where it will get enough sun yet not get overheated and where it will be protected from the frost. Handy this as our conditions in the yard vary as it heats up during the season. Where it will grow nicely now in the cool spring it would bake during the summer. When it does get hot I think the deck stairs on the north side of the house will be best. For right now, either on the south side of the house or even in the greenhouse will work. It is still mighty chilly overnight!
~ ~ ~ ~ ~ ~ ~ ~ ~ ~ ~ ~ ~ ~ ~ ~ ~ ~ ~ ~ ~ ~ ~ ~ ~ ~ ~ ~ ~
Edited to add that the lettuce drawer could use more drainage, or a big sign that says, "Don't water me so much kids!" It doesn't look as healthy as it could.
Thursday, March 31, 2011
City Chickens
Our local town council does not currently allow for chickens or for bees. We would like to see that change. So if you are from Creston BC and would like to join us in this endeavor let us know!
You can leave a comment, and/or join the Facebook group, 'Creston Urban Chickens & Bees' and let's get Creston flowing with eggs and honey ;-)
You can leave a comment, and/or join the Facebook group, 'Creston Urban Chickens & Bees' and let's get Creston flowing with eggs and honey ;-)
Thursday, March 10, 2011
New Project
Yes, it is time for a new project! According to Joanne Gailius we can grow sweet potatoes here so I'm going to give it a try.

Step one was putting the sweet potatoes into water so they can begin to grow slips. It is very important that you purchase organic so they haven't been sprayed to prevent sprouting. Time will tell if this will succeed. As I am food intolerant of regular potatoes I am really hoping this works, grow what you eat and eat what you grow after all.

Step one was putting the sweet potatoes into water so they can begin to grow slips. It is very important that you purchase organic so they haven't been sprayed to prevent sprouting. Time will tell if this will succeed. As I am food intolerant of regular potatoes I am really hoping this works, grow what you eat and eat what you grow after all.
Wednesday, September 1, 2010
Another Day in the Life
Today was a nice puttery type of day. Started off by hanging 3 loads of laundry just in time for Biblical flooding. It will dry faster on the line than scrunched up in the basket but still!
Next we canned up another ten 2-quart jars of dill pickles, nearly to our goal of 50 jars!
Youngest child and I made an addition to the compost bin by adding another bay. Compost bins can be made for free using pallets wired together with old wire coat hangers. Four pallets and you are set! We kept a pile of last year's leaves to one side of the bin, and grass clippings on the other side. Once we had taken out about 4 buckets of materials from the kitchen we forked a layer of leaves over top and then a layer of grass clippings. This kept the smell down and made for a better pile. Over the summer it kept on cooking down, now that is is cooler it is filled and staying that way. Time for a new pile! We'll let that bay 'cook' til spring and focus our efforts on the new bay. I am hoping to build a third bay on the other side to store the leaves we rake this autumn. If we can find enough for layering and even enough to have a leaf mould pile I'll be thrilled.
We then discovered that you cannot hold the grinder in place while you grind up cucumbers and onions for relish. It really must be screwed to a piece of lumber and clamped to your table. A job for tomorrow for hubby I'm afraid.
For supper we had a lovely array of vegetable dishes, potatoes, zucchini pancakes, cucumber salad, plain cucumbers, tomato salad, plain tomatoes, and dilled carrots YUM YUM! Now that dishes are done our daughter is making dessert, in just a few minutes we'll be enjoying 1/2 hour pudding.
A nice puttery day indeed :o)
Monday, August 30, 2010
Oregon Grape Jelly and Elderberry Syrup
Or how the Trowel and Son went foraging and found lots of cool berries.....
Sunday ds was home sick and after a morning hacking out a lung he was feeling chipper enough to take advantage of a brief spell of sun. We grabbed up an ice cream pail, wicker basket and a set of clippers and set off down the railroad tracks to see what we could find. (Should have also taken garden gloves, but I get ahead of myself...)
I had been reading about elderberry syrup and the good it can do with coughs, colds and flu. While driving down the highway Friday I had seen numerous elderberry trees full of fruit, the only question was were there any close to home within walking distance? With ds's cough and the sightings of berries in mind off we went with elderberries being the foraging target.
About 3 'blocks' along we spotted a bank covered with huge Oregon grapes! WOW! MIL makes jelly from these so I knew that we would have to stop on the way home and harvest some of these too.
Ds was having blast finding old railroad spikes and tossing them into the basket. We spotted one elderberry tree with only a few bunches up high, managed to clip a few, not many. Keep on trucking... Then we spotted another bunch of Oregon grapes. Ds had to give up his basket with the idea that we would pick up the pile of spikes on the way back and he could carry them in his sweatshirt. Started picking the fruit only to discover they are REALLY prickly. This could explain MIL's comment about having older ds pick them for her during his visit LOL! Next time we are out foraging must add gloves to equipment.
Finally we spotted an elderberry bush/tree that was just LOADED. Whooo-wee! Foraging heaven. We clipped and clipped until the ice cream pail was full. Now we started back home with the plan to finish filling the basket of Oregon grapes at the first place. Ds took one look at his 'collection' of spikes and decided on bringing home only three instead of the pile he had found. Good choice babe.
While we were busy picking (Okay, I was picking and ds was watching) the Oregon grapes a fellow walking the tracks stopped to see what we were up to. We had an interesting talk about foraging in general and exactly how I was going to prepare the Oregon grape jelly. He headed back to his campsite to get his own pail to give it a try himself.
Once we were home I spent quite a while pulling the Oregon grapes off their stems, then washing them and cooking them down with a little water. Put them in cheese cloth to let them drip and moved onto the elderberries. O.M.G.!!! Talk about an exercise in patience!!! Elderberry bushes are poisonous; leaves, twigs, seeds etc., so I was being careful to remove all stemmy bits, only problem is the berries themselves are the size of the glass pinheads on sewing pins. Now imagine an ice cream bucketful...... Thank heavens for DVDs. They did finally get done, cooked down, and hung to drip too.
One note that Oregon grapes really really really stain. Keep it in mind :o)
Today I cooked up the jelly, 1 cup of sugar for every cup of juice. Boiled it 10 minutes to get it to jell, tested it by putting a teaspoonful onto a cold plate I had placed in the fridge to see if it jelled, poured it into sterile jars, added hot lids, and processed it for 10 minutes. Jelled up really well and Granny, who stopped into bring us some garlic for seed, said it tasted like grape jelly. Whew!
The elderberries were only to be a syrup so no need to make it jell, again 1 cup of sugar per one cup of juice, just brought it to a boil and then canned it. If we had had honey I would have used that instead as local honey is good for illness too. (we don't have any toddlers or babies who need to avoid honey to worry about either)
Next up is making elderberry tincture which sounds very good for you and easy to do, I just need to buy brandy, which I am completely stumped about. Any hints? Maybe Granny has some she could part with, hmmmmm....
Notes to self: 1 bucket elderberries = 2 cups juice, + 2 cups sugar= 4 half-pints of syrup: 1 basket Oregon grapes, about 1 bucketful = 3 cups juice + 3 cups sugar = 4 half-pints of jelly
Saturday, August 28, 2010
Dieing Bean Plants
The bean plants were dieing. Must be some dreaded plague infesting my garden which would spread to all 28 varieties, wiping them out and ruining my business. Not to mention all my friends would shun me and never share bean seed with me again. Life was over.
Turns out the beans in question were simply done. As in finished growing. Like, bean seeds were mature and dry so pick us already would ya! I feel like such an idiot.
So they are now picked and the pods are drying on the racks, the old plants have been composted, their area seeded with fall rye and life is good. Silly Trowel. You should have remembered that that variety was planted 2 weeks before the rest and would naturally be ahead. Wasn't rust, wasn't blight, wasn't anything, silly Trowel.
Monday, August 16, 2010
Making the Sauerkraut
My mom can grow cabbage, man, can she ever. Me, not so much. Which is weird. I mean how hard can it be? You put in the transplants, water when dry, and they should grow, right? Anyways, mom is only one person and she has this habit of growing way too much cabbage for herself so we get blessed with it regularly, which is great, as I can't seem to get the stuff to grow at all.
I thought it time, with all this cabbage at hand, to branch out and learn how to make sauerkraut. Fortunately for me both my mom and my aunt make this regularly so the equipment and mentoring are readily available. I'll be contributing the sweat equity ;-)
The Tools:
[please pardon the lousy pictures, dd broke my camera and I'm stuck with her POC]

-cabbage mandolin, which I wrote about previously.
-crock
-kraut pounder, and, no son, it isn't for bludgeoning innocent German bystanders, yesh
-big bowl
-scale
-pickling salt and cabbage
-cheese cloth
-small plate
-caning jar full of water with a lid
The Method:
First mandolin up all of your cabbage, I did one head which weighed 5 1/2 lbs. A solid head cuts up way easier than a loose head so if you have a choice choose the heavier solid head. You can do this step with a really nice knife, you are going for a very thin shred not little bits.
Next put about 2 1/2 lbs, (half of the cabbage) into your largest bowl and toss with 1 Tbsp. pickling salt. Let sit 10 minutes. The ratio of salt to cabbage is 2 Tbsp. of salt per 5 lbs. of cabbage. So about 2 Tbsp. per head. Mom says if your sauerkraut turns out too salty you can rinse it in a sieve under running water just before you cook it. And, son, I apologise for leaving the salted cabbage on the counter making you think it was a salad, really I do. I hope the taste goes away soon, truly.
Then put 1/2 the salted cabbage into the crock and get to pounding. This makes the juice. You can just use your fist instead of an official kraut pounder, I got lucky at a garage sale and found mine. Mom and her mother before her just punched the stuff. Who needs a punching bag to release aggression? Just make kraut!!
Once this layer is juicy add the rest of the salted cabbage and pound it too. Then salt the rest of the cabbage, let it sit, pound some, add and pound the rest. I pounded the last bit in the bowl as pounding it in the crock was sending up a shower of juice.
The one head gave me 2 1/2 inches of sauerkraut in the crock.

Once all of the cabbage has been added lay a double layer of cheese cloth over it and put a plate that fits down inside the crock in. Put in your weight, in my case a canning jar full of water, which will hold down the plate and keep all of the cabbage under the brine.

Then once a day remove the cheesecloth and any scum, wash out the cloth with plain water and return it to the crock with the plate and weight. Repeat.
The sauerkraut is ready to eat and be canned when it stops bubbling. Process your jars 20 minutes for pints (500mL) or 25 minutes for quarts (1L). Information from the Bernardin site.
Now important note from Granny! DON'T use all of your cabbage in your first batch. Think of it as your beta batch and only do one head. You can do this and still have time later to make a big batch if it turns out well and you like it. DON'T risk wasting all your cabbage!!!
New note from Granny! You can't make sauerkraut when it is this hot. It goes bad, really bad, wait til fall :o) Batch one - went b.a.d. - ick. Will try again when it is cooler, like next month.
Saturday, August 14, 2010
Radical Homemakers????
 sourdough starter and jelly juice in front of our flour mill
Am I a Radical Homemaker? I'm really not too sure. Dh and I were farmers, I was a farmer's wife. This is just what we did. Moving into town didn't change who we were.
I have been reading Shannon Hayes' book Radical Homemakers and while I'm thinking that the historical part was interesting it just wasn't applicable to my female ancestors. There were no bored 50's housewives swanning about with their electrical appliances in my family tree. They were all farm wives too busy canning the heck out of anything that didn't move to feel bored, undervalued, and superfluous. They were empowered strong women with a true sense of their value and their place. It takes two to farm, there needs to be a division of labour simply because there is too much of the darn stuff to do on one's own. [Just ask my uncle's divorced friend who farms on his own and lives on Mac'n'Cheese]
My maternal grandmother, and both maternal great-grandmothers were married to farmers. Their families cleared the land my uncles now farm. We are on the second generation on one farm, the third on another, and the fourth on yet another. Best part is these farms are all side by side. I spent summers on my grandparent's farm walking over to my uncle's playing with my cousins, and wandering over to my grandfather's aunt's farm for that rare treat - koolaid!
Best memory ever? A whole bunch of aunts and cousins gathered around a big galvanized tub full of pea pods in the kitchen. We all were sitting there with enameled bowls in our laps shelling like crazy as grandpa bought in bucket after bucket of peas. Gabbing like mad, every once in a while someone would shout, "Ooops! I pea'ed on the floor!" and we would all burst out laughing. Grandma blanching the peas and shushing us all when the farm report came on the radio. Man did we ever have to be quiet then! The price of beef was the really important news.
Even though my mom and I lived in the city I knew from my summers with my grandparents, uncles and aunts that that was real living, not the working 40 hours at an office like my mom did. She had to as a single mom to make ends meet, but even she knew that wasn't where her life was. She hung laundry, gardened, baked whole wheat bread, canned, and was an inspiration. Radical Homemaker skills aren't new to me, I've seen them modeled my whole life! And while I am kicking myself for not asking my grandma more, "How did you used do THIS?" questions before she passed I'm thankful I still have my mom and aunt to pester :o) So, mom, I want to make sauerkraut......
ETA: Rhonda Jean over at Down--to--earth wrote about Radical Homemaking as 'Homemaking, the power career', well worth the read.
Thursday, August 12, 2010
Bucket Pickles - The Dill Version
[With apologies for the lousy pictures, must get my camera fixed!]
One of the most popular posts here at The Urban Trowel is the bucket pickle recipe. It is for a sweet pickle though and I'm thinking that people may actually be looking for a quick and easy dill pickle in a bucket. Nothing ventured nothing gained!
I do know that Margaret's dill pickle recipe was originally not processed but stored in the fridge once sealed. The two of us started processing them as we have pickle crazy families and not enough fridge space for 100 quarts! Sooooo it should be easy to make bucket dills from our favourite recipe with a little tweaking.
The first cucumber picks are usually too small to bother with the whole dragging out the canner thingy. Bucket pickles to the rescue!

Wash them well to remove dirt, spiny bumps, and the blossom bits.

Trim the ends off and poke them with a fork a few times.

In an well washed ice-cream bucket put 4 large cloves of garlic, and 2-3 big heads of dill. If you don't have access to fresh dill just use a Tbsp. of dill seed from the spice aisle.
Add the cucumbers.

In a large pot mix the brine:
-8 cups water
-2 cups PICKLING vinegar
-1/3 cup white sugar
-1/2 cup PICKLING salt

Heat till bubbling and pour over cucumbers. You may have more brine than you need, it can be stored in the fridge for the next batch or it makes Jim-dandy weed killer.
Put the lid on and mark it with the words BEST BEFORE (the date 6 months hence)
Pop it into the very back of the fridge, let sit at least 2 weeks then enjoy!
Too easy.
Variation:

If you aren't thrilled with the idea your food soaking in a bath of acid in a plastic container you can do this in a large glass jar. I find 1 gallon glass jars at second hand shops and garage sales for about $1-5 each. Even if they don't have lids I snatch them up. Peanut butter and mayonnaise jar lids will often work on these.
Just put the ingredients in the jar and wait for it to cool a bit before adding the lid. I didn't wait once and had a truly hellish time trying to get the well sealed lid off.
In this jar I'll be adding cucumbers as they are picked. As you can see this picking was really small.
Sunday, August 8, 2010
Drying Gleaned Cherries
Our town has a wonderful program called Harvest Share. Basically anyone who has any type of fruit or vegetable that they don't want or can't pick can call in and have volunteers come and pick for them. One third of the produce goes to the owner, one third to the volunteer picker, and one third to the food bank, the seniors' program, or some other feeding the needy agency.
Last week we got the call that a commercial cherry orchard had sustained so much wasp damage that it wasn't going to be picked and we were called in to glean it. Lots of volunteers came and lots of cherries were able to be saved. The picking was rough though. It took our group of 3 adults and 3 children 3 1/2 hours to pick 140 lbs. The bonus was that the owner didn't want any cherries so we took home 80 lbs. for us, and 2 ice-cream pails each for our friend and for granny. [Our friend's family is quite sick of cherries and granny didn't want many, we weren't being greedy they were being generous]
And did I mention the wasps? They weren't too pleased to have their food being bothered. Luckily I was the only one stung in our group, I'm not allergic and I'm a big girl so I sucked it up and kept on picking, a little more warily though!

Once we got home we fired up the production line. One child washed the cherries, removed stems, and tossed any with rot or mold.

I ran them through the cherry pitter. It doesn't work all that well on these huge cherries, next batch we skipped this and did the pitting manually.

The next child cut the cherries in half, removed any remaining pits, and put them cut side up on the dehydrator's trays. Have you met our dryer before? It is huge. Amazing what you can find on Kijiji!

Once a tray was full my 16 yo son carried it out to the drier and slid them into place.

When we finally got all six trays full it was time to fire it up and dry those puppies!
About 24 hours later those 20 lbs of cherries were reduced to 10 cups of dried cherries. YUM YUM YUM. We ran another batch through and then I bagged them up 4 cups to a freezer grade Ziploc baggie and tossed them into the box in the freezer marked FRUIT.
We also made 4 batches of cherry jam and there are still about 20 lbs. waiting to be dealt with. Pie? Syrup? Juice? fruit leather? Just freeze them???
Thursday, July 22, 2010
Scything
Made every one's commute to work a little more surreal this morning.
We live on a main road in town that a lot of people take to work each day. Combine that with deciding to scythe the chicory in the lawn as well as edging the weeds around the front yard garden. Not a sight you see on way to work very often, someone scything their lawn!
One of the walkers thought scything was how we kept our lawn cut. LOL! I told her that I was just cutting the thick weeds that the mower missed, I didn't want her misinformed. [not to mention telling inaccurate stories around the water cooler]
But truly what would you rather have your neighbour do? Lawn mowing and weed-whacking at 6 am? Or reel mowing and scything??
The later are so quite in comparison, not to mention eliminating the whole smell of gas and oil. I know which one the birds prefer!
Monday, July 19, 2010
When Raspberries Begin Turning Pink - Go Pick Saskatoons!

That is the way to remember when to search out these gems.
Last year it was too dry for a good picking of saskatoons, this year with all of the rain they are huge, like blueberries.
DS and I stopped along the side of a rural road and picked an ice-cream pailful today, we plan to pick more tomorrow. I'm trading driving lessons with him for his help picking. Dual purpose for our gas usage!
After a quick picking through and a wash they were popped into the freezer to await their future as muffins and pancake sauce.

One funny ... I was trying to find out if drying saskatoons is viable. Are they too seedy or are they just right for a late winter addition to my morning granola?
Googling this lead to wonderful gems such as, "Drying Characteristics of Saskatoon Berries under Microwave and Combined Microwave-Convection Heating" not to mention, "Chemical Composition of Saskatoon Berries (Amelanchier alnifolia Nutt.)" and let's not forget , "it is clear that the saskatoon berry exhibits antioxidant activity based on its anthrocyanin and phenolic composition..."
Whoa People!!! All I wanted was a simple answer to a basic question. Is it worthwhile to dry saskatoons????
The best answer? ... Well the 'O Gourmet' website tells us, "The Saskatoon berry was of significant economic importance to the Plains Indians who would sun-dry the fruit. The berry was an important ingredient in pemmican" and we all know what a hot seller pemmican is down at 7-11!
I even phoned a saskatoon loving local locavore to ask the now nagging question in search of the elusive answer and her reply... never tried it! A.R.G. is all I can say.
I now have a cup of saskatoons in my fruit dryer, I will be posting the answer to the question.... maybe Google can get a life then ;o) [or at least let people know yea or nay without having to read doctoral theses!]
- - - - - - - - - - - - - - - - - - - - - - - - -
Edited to add:
I think I dried them too long. Little pebbles. And they are seedy. Hmmmm. I'll have to try again next year and see if this can be done well.
Subscribe to:
Posts (Atom)




 Posts

